Why sing before you play? Why do we learn chords on the guitar?How to create strumming patterns?....
Lesson 2 – C and Am chord
Chord learning Routines: The C and Am chord
1 Introduction
1.1 What are you going to learn?
In this lesson you will learn a C and Am chord, and use them to play this 4 bar song song.
You will learn the shapes, how to play the chords with clarity and above all, play them in a context that simulates the real thing. This means that you will learn to hear in advance the music you wish to play, so as to prepare and synchronise your left and right hand to play it, to a beat.
You will not be reading what you have to play, but rather, hearing what you have to play. This way of learning and playing, will be more rewarding, it will increase your learning speed and therefore your final satisfaction.
You will also consolidate a routine, for learning other shapes, with a self assessment criteria that will prove to you that you know it.
1.2 How are you going to learn?
Step by step, having fun, and following strictly my guidelines to help you immediately create some beautiful music.
So, rather than simply playing two chords with no logic, you will learn how to use them to play a song with feeling. This end result feels better, it also makes sense and as a consequence you have more fun and learn quickly.
You will learn the chords and songs in four steps.
1.2.1 Step one
In step one you will relate visually the shape of the chord, to the fretboard, to place your fingers in a specific sequence and arpeggiate the chord to create a four beat musical phrase.
You will identify the foundation of the chord, the note on which it is constructed from. That is our target note, the note to look for whenever we want to play any chord.
In step one, you will learn how to produce clear chordal sounds with patience and repetition.
1.2.2 Step two
You will initiate a slow practice routine to memorise and consolidate the shapes of the chords.
You will play the chords in tempo to create rhythm and further consolidate the clarity of the execution.
1.2.3 Step three
In step 3 you will play this song, a simple 8 bar song, where you play chords for half of the time, the rhythm of the song, and the other half you will play the melody, which would be the vocal line, what the vocalist of a band would sing.
1.2.4 Step four
You will complete assignments to prove that you have learnt the how and what of playing the C and Am chord.
2 Step 1: How to memorise a shape ( The C and Am chord )
2.1 The Goal
The goal of step one is to learn to play a chord by applying the following routine.
In this course you will first see the shape of a chord as a diagram, then you will apply this routine:
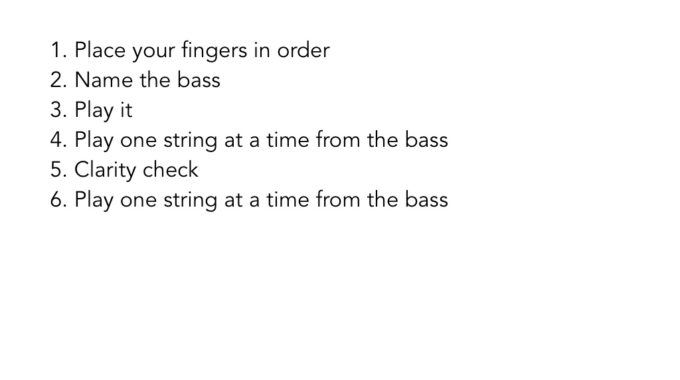
- Place your fingers in order
- Name the bass
- Play the bass
- Play one string at a time from the bass
- Clarity Check: If a string sounds muted,place a pen underneath the tips of your fingers and lift them, this will clean up the sound
- Play one string at a time from the bass
Let’s learn this routine.
2.2 How to understand a diagram
In the following diagrams you will see chord shapes with numbers.
These numbers correspond to the following fingers of the hand, that you will use to apply pressure onto the fretboard.
Right handed people generally use the left hand to form the shapes. Left handed people generally use their right hand.
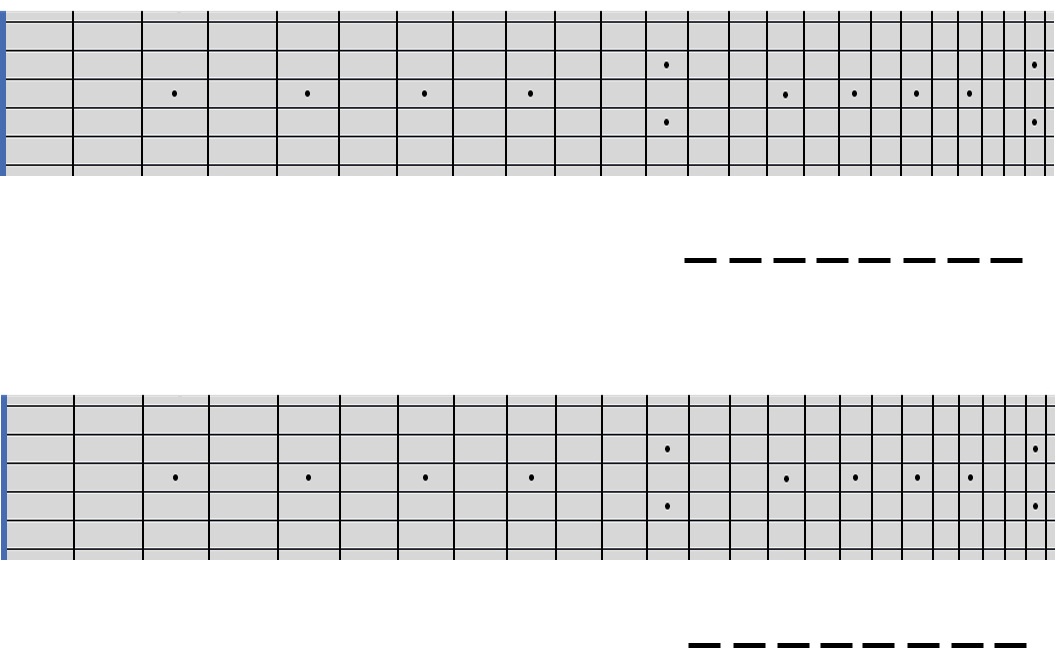
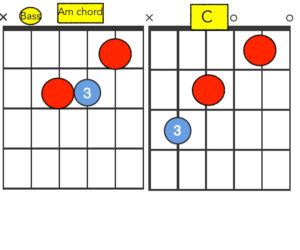
2.3 C Chord
Your first objective in this learning will be to relate the chord diagram to the guitar fretboard.
This is the C chord diagram. In the diagram you have vertical lines and horizontal lines.
The vertical lines represent the frets. The horizontal lines represent the strings in order from sixth to first.
2.3.1 Fingers
1st finger where ?
Look at the diagram and relate.
Where must I place my first finger to start creating the shape?
On what fret?
My first finger, as shown in the diagram must go in the first fret.
On what string?
My first finger, as shown in the diagram, must go on the second string.
Place your finger down.
2nd finger where ?
Let’s move on to the second finger. Please leave your first finger down.
Ask yourself: Where must I place my second finger to continue creating the shape?
What fret?
My second finger, as shown in the diagram, must go on the second fret.
What string ?
My second finger, as shown in the diagram, must go bn the fourth string.
Place your second finger down.
3rd finger where?
Let’s move on to the third finger. Please leave your first and second fingers down.
Ask yourself: Where should I place my third finger to continue creating the shape?
What fret?
My 3rd finger as shown in the diagram, must go on the third fret.
What string?
My 3rd finger, as shown in the diagram, must go on the fifth string.
Say three and place your third finger down and strum with your thumb.
2.3.2 Get a good sound
Are any of the strings buzzing when you strum?
If they are you need to raise the tips of you finger fingers, grab a pencil and lift them, also extend your wrist. Look at the angle of the hand in relation to the guitar. Look at how my wrist is straight, correct your position and play the chord again.
Are you still hearing some buzzing? Repeat the clarity check.
Consolidate
I would suggest before you continue to rewind the video from the start and repeat all the instructions.
2.3.3 What is the bass
I hope this question has come to your mind. The bass is the lowest note of the chord on which we build it from, the foundation.The bass is the name of the chord.
So the bass of C is c. Where is the bass? The bass c has to be the lowest note of our chord, and in this case, we produce the c note as a bass by pressing the 3rd fret on the 5th string.
2.3.4 Play the C chord
You are now ready to apply swiftly the chord learning routine. Play along with me.
- Name the bass
- Play the bass
- Play one string at a time from the bass
- Clarity Check: If a string sounds muted,place a pen underneath the tips of your fingers and lift them, this will clean up the sound
- Play one string at a time from the bass
Rewind and repeat this last section
2.3.5 Tips
Some tips to keep in mind.
-
Keep your hand relaxed
As a general rule, to avoid unnecessary strain, keep your fingers on the fretboard just the necessary time to create the sound you wish and then let go. -
Repetition
I also find it more practical, to help develop long term memory, not to repeat each exercise, more than two consecutive times, before taking a break or moving on to a new exercise.
2.4 Am Chord
Let’s take a break from the C chord and learn the Am chord.
2.4.1 Fingers
Please look at the shape and where each finger is placed. Play the chord in the following sequence:
Place your fingers in order
and ….
say aloud the fingers as you do so.
Say one and place your first finger down.
To do so you must have answered the question: What fret and what string does my first finger go on? In this case fret 1 string 2.
Let’s do it together.
Say two and place your second finger down.
To do so you must have answered the question: What fret and what string does my second finger go on? In this case fret 2 string 4.
Let’s do it together.
Note: Please make sure your first finger stays in place.
Say three and place your third finger down.
To do so you must have answered the question what fret and what string does my third finger go on.
Let’s do it together
Keep your fingers in place.
2.4.2 The bass
Name the bass of the chord
What is the bass of the Am chord ? a. The bass is the name of the chord; on top of which we add more notes to compete the sound.
Where is the bass of the Am chord?
The bass is in the low register. This is the low part of the guitar. The bass can be an open string or a string I am pressing with my left hand.
So do I have a low open string that sounds like a? Yes I do. So, this is the bass and the lowest note of the chord from which we play our chord from.
Play.
2.4.3 One note at a time
Play this chord with me, one note at a time, count it in: 1 2 3 4.
2.4.4 Get a good sound
If any of your notes do not sound clear enough, please use the pencil to correct your finger placement.
Play the chord one note at a time.
2.4.5 Play the Am Chord
You are now ready to apply swiftly the Chord Learning Routine. Play along with me.
Am chord
- Name the bass
- Play the bass
- Play one string at a time from the bass
- Clarity Check: If a string sounds muted, place a pen underneath the tips of your fingers and lift them, this will clean up the sound.
- Play one string at a time from the bass
Rewind and repeat this last section.
3. Step 2, Play C and Am chord in tempo
To move on to step 2, you must be able to already play with clarity the C and Am chord.
You will now learn to play the C and Am chord in this manner:
3.1 The Goal
Listen
3.2 Working towards the goal
3.2.1 Spot the common notes
In order to jump from the C to Am chord you need to find the similarities between them. Practice with me this combination. Get your fingers ready for the C chord but apply the Chord Learning Routine.
- Play one string at a time from the bass. ( 1 and 2 and 3 and 4 move)
3.2.1 Slowly join the chords
Now lift up your third finger, put in on the third string and play the Am, and 1 and 2 and 3 and 4. In the diagram in red, you can see the common notes.
3.2.2 Play along with me non stop
Repeat with me, try not to stop and also say what I am saying: 1 and 2 and 3 and 4 move. The word move is your cue to move your finger. This time I will play the chords two times.
C Chord.
- Name the bass
- Play the bass
- Play one string at a time from the bass:1 and 2 and 3 and 4 move, 1 and 2 and 3 and 4 move
Do not lift your fingers up from the fretboard.
3.2.2 Clarity Check
Please take a moment to correct your position and sound both with the C and Am chord. Strum each chord to check for clarity.
3.3 Repeat all step 2
4.0 Step 3, Play a song
4.1 The Song
Listen
4.2 Learn the chords
This song is made up of chords and a melody.
Let’s learn the chords. First get the C shape in place.
4.2.1 Listen
Listen to what you have to do, tap your feet and move your body to the beat.
4.2.2 Imagine
Keep tapping your foot, move to the beat and imagine the sound of what I have just done.
4.2.3 Sing
Sing what I have just done.
4.2.4 Play
Play it with me.
4.2.5 On your own
Stop the video and do it on your own. After each repetition ask yourself the following:
Check questions
-
Did you turn on your metronome?
-
Did you tap always your foot while playing?
-
Did you count it in?
-
Did you sing or say what you were doing?
Repeat
Repeat this exercise as many times as you need, until you can answer with a yes all the check questions.
4.3 Learn the melody
Let’s learn the melody.
4.3.1 Listen
Listen to what you have to do and tap your feet to the beat.
4.3.2 Imagine
Keep tapping your foot and move your body to the beat, and Imagine the sound of what I have just done.
4.3.3 Sing
Sing what I have just done.
4.3.4 Play
Play it with me.
4.3.5 On your own
Stop the video and do it on your own.
Check questions
-
Did you turn on your metronome?
-
Did you tap always your foot while playing?
-
Did you count it in?
-
Did you sing or say what you were doing ?
Repeat
Repeat this exercise as many times as you need to, until you can answer with a yes all the check questions.
Let’s combine the chords together with the melody.
4.4 Play along with me
4.4.1 Rewind and repeat
5.0 Step 4 Assignments
5.1 Quiz
Please submit your replies to the group forum for peer review.
- What is the bass of the Em chord?
- If the C chord has three notes C E G, draw on the fretboard diagram, two new shapes that have these three notes.
- If the Am has three notes A C E, draw on the fretboard diagram two new shapes that have these three notes.
- What is the summary of steps you have to follow to learn a new chord ?
Place your ……
Name ……. Play the ………
Play one …….Count …….
Clarity……….
Play one …….Count ……..
- What is the difference between strumming a chord and playing the chord one note at a time?
- What is the beat of a song?
- What is the difference between the melody and chords of a song ?
5.2 Record yourself
Record yourself in video, with your phone, playing example 3.2.2. Your recording must answer yes to the following check questions. Once you are satisfied please submit your recording to the teacher.
Check questions
-
Did you turn on your metronome ?
-
Did you tap your feet while recording ?
-
Did you count it in ?
-
Did you sing what you were doing?
5.3 Record yourself
Record yourself in video, with your phone, playing example 4.1. Your recording must answer yes to the following check questions. Once you are satisfied please submit your recording to the teacher.
Check questions
-
Did you turn on your metronome ?
-
Did you tap your feet while recording ?
-
Did you count it in ?
-
Did you sing what you were doing?
5.4 Record yourself
Record yourself in video, with your phone, playing C | Am | C |Am, each chord lasts 4 beats. Strummingwith a pick or thumb. Your recording must answer yes to the following check questions. Once you are satisfied please submit your recording to the teacher.
Check questions
-
Did you turn on your metronome ?
-
Did you tap your feet while recording ?
-
Did you count it in ?
-
Did you sing what you were doing?
-
Are you strumming form the bass ?
-
Can you hear every single note with clarity?
5.5 Play the Em chord
Write the routine you have to follow to learn the Em chord. Apply the routine and learn it.
5.6 Play the G chord
Write the routine you have to follow to learn the G chord. Apply the routine and learn it.
Note
Songwriting and music production, courses, tips, studio recordings how to write a song, can be found through the corresponding links. Please go to the main website to view all courses available at my Melbourne Guitar Lessons site.
Related Posts